Page History
...
At least one user account with a Power BI Pro or Power BI Premium Per User (PPU) license.
This user will become the owner of the app workspace in Power BI and will be able to share it with others in the organization and collaborate on reports.
End users who just need to consume reports, do not need a Power BI Pro or a Power BI Premium Per User (PPU) license. You can export reports for them (to CSV, PDF, Excel) or embed the report within SharePoint (using the publish to web - creates We highly recommend Power BI Premium Per User (PPU) to benefit from increased Power BI resources, faster report loading and refresh times, and enhanced capabilities for monitoring Power BI capacity and resource usage. To find the optimal Power BI license plan for your organization, you can use this Power BI licensing calculator.
Note: End users who only need to consume reports do not require a Power BI license. You can share reports with them in exported formats, such as CSV, PDF, or Excel, or embed them within SharePoint using the "publish to web" feature (which generates a public link to the report).
End users will login can access Power BI reports by logging in with their personal Microsoft 365 accounts to the Power BI web interface to access Power BI reports. There is no need to install Power BI for desktop.Make sure that the user account is able to create a new workspace in Power BI.
Power BI Admin Portal > Tenant via a web browser. Installing Power BI Desktop is not required.An account with Global Admin permissions is required to perform the following actions:
Grant Permissions to the CardioLog Analytics Power BI Connector Azure Entra ID (Azure AD) App to enable the app to connect to your organization's Power BI environment. The app is automatically created after connecting to Power BI in the configuration page.
Create a new security group in Azure Entra ID (Azure AD) - Microsoft Azure Portal > Azure Entra ID > Groups > New Group
Add the CardioLog Analytics Power BI Connector app registration as a member in the newly created security group.
Allow the app to use the Power BI API - Power BI Admin Portal > Tenant Settings > Developer Settings > Enable Service principals can use Fabric APIs, select Specific security groups and add the previously created group.
Create a new CardioLog Analytics SaaS workspace in Power BI - Power BI Admin Portal > Tenant settings > Workspace settings > enable the Create workspaces (new workspace experience) setting
.
Add the app as an Admin on the workspace - Power BI > Workspaces > CardioLog Analytics SaaS > Manage access > Add people or groups > add the created security group and assign the Admin role.
The Power BI dataset size is limited based on your Power BI license. In case the limit is reached, upgrade your Power BI license plan.
The Power BI data processing resources are limited based on your Power BI license. In case resources are exceeded, upgrade your Power BI license plan.
The Power BI dataset is refreshed once a day. Only one dataset is allowed. In case multiple datasets and/or multiple refreshes per day are required, contact us to upgrade your subscription plan.
Support for custom made Power BI reports and measures, as well as integrations with additional data sources will require professional services.
...
- Access to the internet from all end users workstations, make sure that the following domains are not blocked by the browser: "azurewebsites.net" and "windows.net"
The URL of the SharePoint admin center of the SharePoint tenant you will be setting CardioLog Analytics on.
An account with Microsoft Office 365 365 Global Admin permissions is required in order to install the CardioLog Analytics SaaS App.
- Make sure that your tenant allows custom Apps authentication in order to install the CardioLog Analytics SaaS App and in order for CardioLog Analytics SaaS to securely communicate with the SharePoint API.
Note: In case your tenant has this option disabled and DisableCustomAppAuthentication is set to True (note that it is disabled by default for SharePoint Online tenants created on August 2020 or later), you can execute the following command in SharePoint Online Management Shell in order to enable it:
Info icon false Set-SPOTenant -DisableCustomAppAuthentication $false
- Make sure control access based on specific network locations is turned off, in order to allow communications to CardioLog Analytics SaaS.
Office 365 Admin > All Admin Centers > SharePoint > Policies > Access control > Network location > Turn off "Allow access only from specific IP address ranges".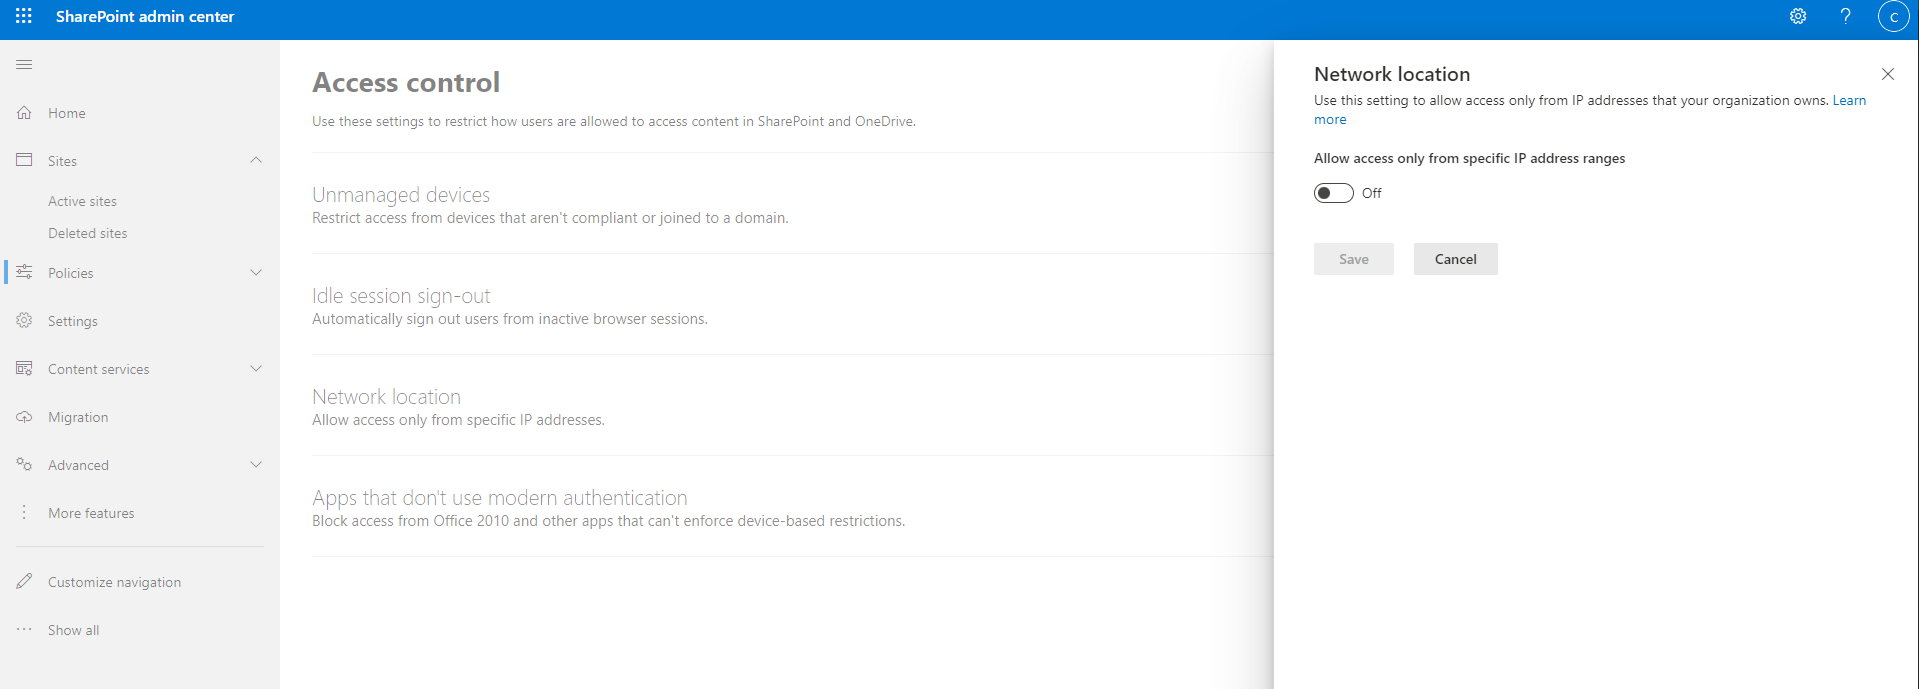
- Verify an App Catalog is available in the SharePoint Online tenant:
- Sign in to Office 365 with your SharePoint Online global admin account.
- Go to Office 365 Admin > All Admin Centers > SharePoint.
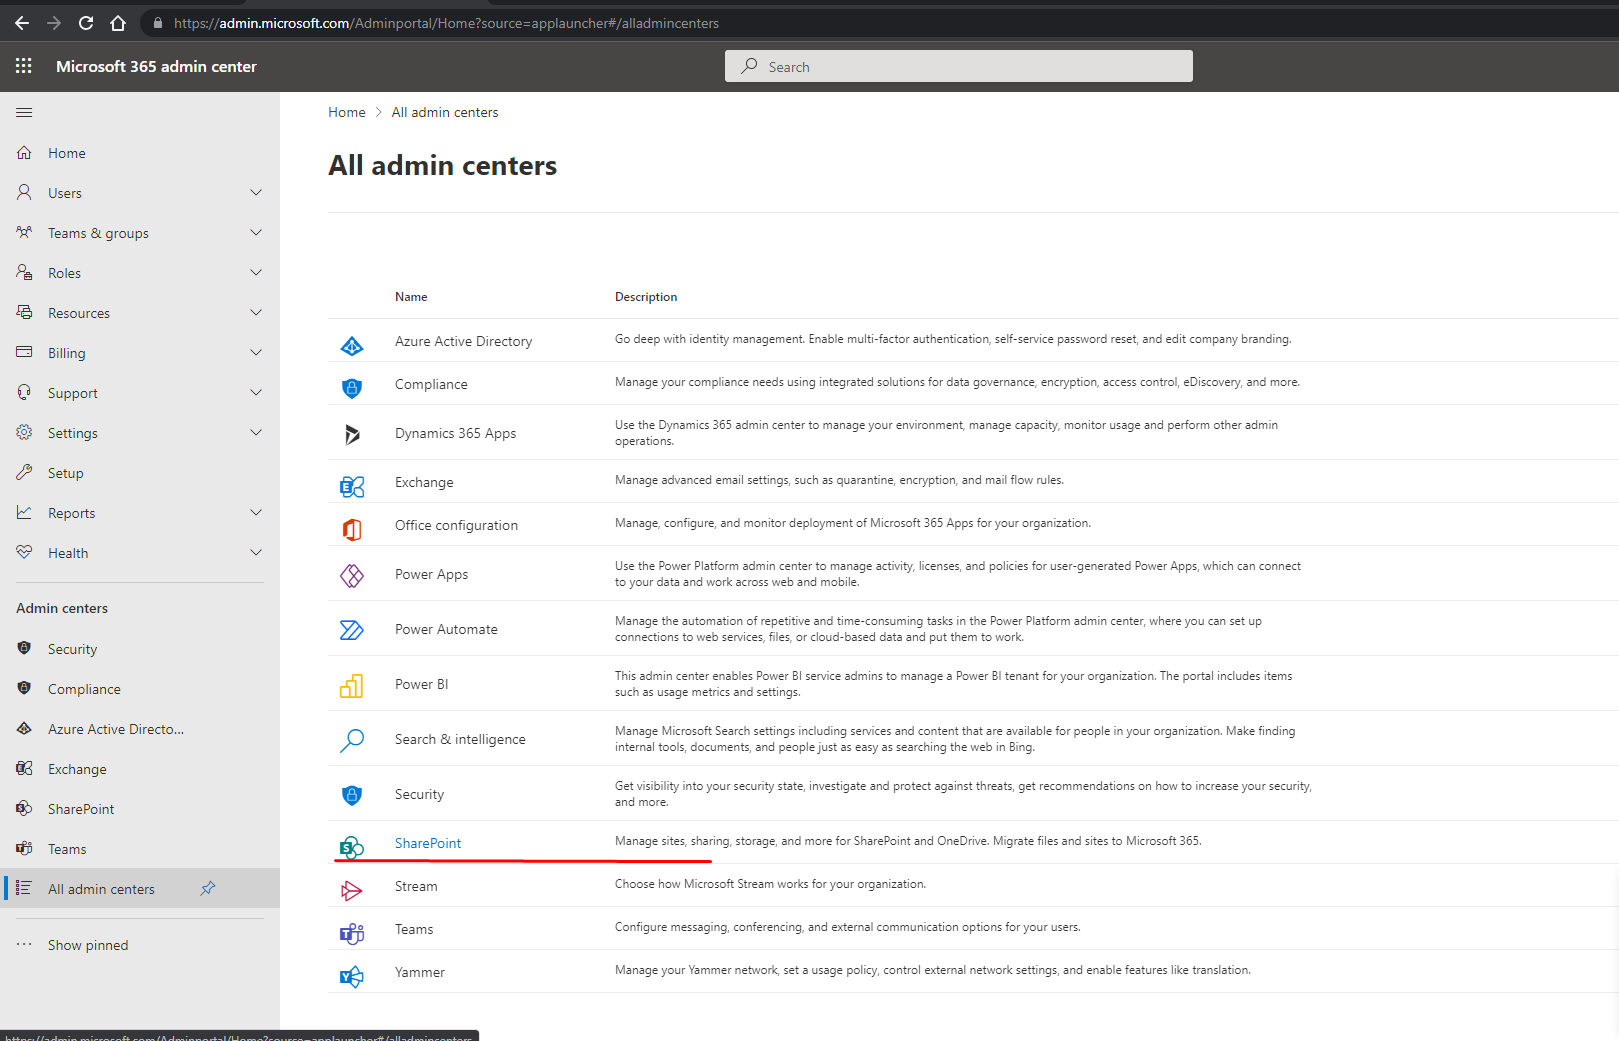
- Select Apps from the Quick Launch bar on the left, and then select App Catalog
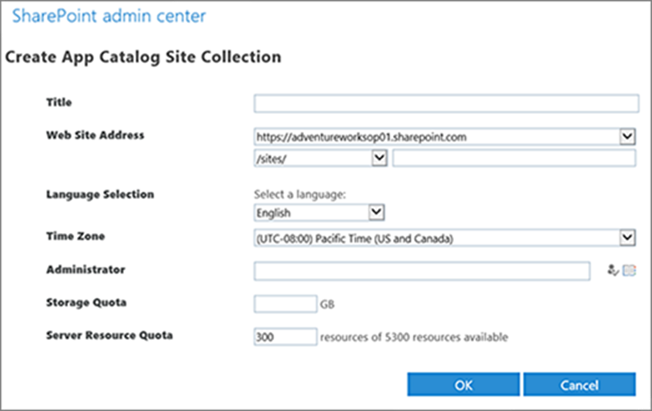
- If there is no app catalog site created yet, select Create a new app catalog site, and then select OK.

- On the Create App Catalog Site Collection page, enter the required information, and then select OK.
Prerequisites for installing the CardioLog Analytics SaaS Tracking Agent
Prerequisites for installing the CardioLog Analytics SaaS Tracking Agent using a SharePoint App
- When using a Microsoft Entra ID App (recommended):
- Prepare a SharePoint global administrator account to consent to the required permissions to automatically install all tracking components on your sites.
- When using a SharePoint App (deprecated):
- Prepare a SharePoint global administrator account to create a 'full-trust' SharePoint App.
- Make sure that your tenant allows custom Apps authentication in order for the SharePoint App to securely communicate with the SharePoint API.
Note: In case your tenant has this option disabled and DisableCustomAppAuthentication is set to True (note that it is disabled by default for SharePoint Online tenants created on August 2020 or later), you can execute the following command in SharePoint Online Management Shell in order to enable it:
Code Block Set-SPOTenant -DisableCustomAppAuthentication $false
- Make sure that the site collections you would like to track are not locked with NoAccess state.
Prerequisites for installing the CardioLog Analytics SaaS Tracking Agent using a PowerShell Script
- Prepare a Microsoft Office 365 service account with the following permissions in order to install the CardioLog Analytics SaaS Tracking Agent:
- SharePoint tenant administrator account;
- Site collection administrator (not just administrator) of the app catalog site collection of your tenant;
- Administrator of all the site collections that you are looking forward to include in the CardioLog Analytics SaaS reports.
- Make sure you have PowerShell version 5.1 or higher, with the MSOnline module installed.
Custom scripts should be temporarily allowed for the duration of the installation installation (DenyAddAndCustomizePages should be set to to Disabled), on your App Catalog and on each site collection you wish to monitor, in order to add the JavaScript tracking code and Tracking Agent application (sppkg for modern sites, wsp solution for classic sites).
Make sure that the site collections you would like to track are not locked with NoAccess
state.- If end users are using IE 9/10/11 with Medium-High security level and above, they will have to manually enable the IE Active Scripting option for the appropriate security zone as follows: Open IE -> Tools -> Internet
Options -> Security -> Choose the appropriate security zone (Internet Zone most likely) -> Custom Level... -> Scripting -> Enable the Active Scripting option. Another option is to add the event listener host URL to a IE security zone with Medium or lower security level (e.g. Trusted Sites) or to add the Azure event listener host URL to Trusted Sites. If end users are using IE 9, they will also have to manually enable the Access data sources across domain option as follows: Open IE -> Tools -> Internet Options -> Security -> Choose the relevant security zone (Internet Zone most likely) -> Custom Level... -> Miscellaneous -> Enable the Access data sources across domains option. state.
Prerequisites for installing the CardioLog Analytics SaaS Tracking Agent manually
- Prepare a Microsoft Office 365 service account with the following permissions in order to install the CardioLog Analytics SaaS Tracking Agent components:
- SharePoint tenant administrator account;
- Site collection administrator (not just administrator) of the app catalog site collection of your tenant;
- Administrator of all the site collections that you are looking forward to include in the CardioLog Analytics SaaS reports.
Custom scripts should be temporarily allowed for the duration of the installation (DenyAddAndCustomizePages should be set to Disabled), on your App Catalog and on each site collection you wish to monitor, in order to add the JavaScript tracking code and Tracking Agent application (sppkg for modern sites, wsp solution for classic sites).
- Make sure that the site collections you would like to track are not locked with NoAccess state.
Prerequisites for tracking PnPSearch
| Info |
|---|
| Note: Tracking PnP Search in SharePoint Online requires an additional license and is not included out-of-the-box. |
Supported Versions:
PnP Search version 4.7
PnP Search version 4.13
Supported Controls:
Search control
Search Results control
Supported Layouts in the Search Results Control:
List
Details List
Prerequisites for SharePoint On-Prem
Prerequisites for installing the CardioLog Analytics SaaS Power BI Reports
At least one user account with
a Powera Power BI Pro or Power BI Premium Per User (PPU) license.
This user will become the owner of the app workspace in Power BI and will be able to share it with others in the organization and collaborate on reports.
End users who just need to consume reports, do not need a Power BI Pro or a Power BI Premium Per User (PPU) license. You can export reports for them (to CSV, PDF, Excel) or embed the report within SharePoint (using the publish to web - createsWe highly recommend Power BI Premium Per User (PPU) to benefit from increased Power BI resources, faster report loading and refresh times, and enhanced capabilities for monitoring Power BI capacity and resource usage. To find the optimal Power BI license plan for your organization, you can use this Power BI licensing calculator.
Note: End users who only need to consume reports do not require a Power BI license. You can share reports with them in exported formats, such as CSV, PDF, or Excel, or embed them within SharePoint using the "publish to web" feature (which generates a public link to the report).End users will login to the Power BI web interface to can access Power BI reports . There is no need to install Power BI for desktop.
Make sure that the user account is able to create a new workspace in Power BI.
Power BI Admin Portal > Tenant by logging in with their personal Microsoft 365 accounts via a web browser. Installing Power BI Desktop is not required.An account with Global Admin permissions is required to perform the following actions:
Grant Permissions to the CardioLog Analytics Power BI Connector Azure Entra ID (Azure AD) App to enable the app to connect to your organization's Power BI environment. The app is automatically created after connecting to Power BI in the configuration page.
Create a new security group in Azure Entra ID (Azure AD) - Microsoft Azure Portal > Azure Entra ID > Groups > New Group
Add the CardioLog Analytics Power BI Connector app registration as a member in the newly created security group.
Allow the app to use the Power BI API - Power BI Admin Portal > Tenant Settings > Developer Settings > Enable Service principals can use Fabric APIs, select Specific security groups and add the previously created group.
Create a new CardioLog Analytics SaaS workspace in Power BI - Power BI Admin Portal > Tenant settings > Workspace settings > enable the Create workspaces (new workspace experience) setting
.
Add the app as an Admin on the workspace - Power BI > Workspaces > CardioLog Analytics SaaS > Manage access > Add people or groups > add the created security group and assign the Admin role.
The Power BI dataset size is limited based on your Power BI license. In case the limit is reached, upgrade your Power BI license plan.
The Power BI data processing resources are limited based on your Power BI license. In case resources are exceeded, upgrade your Power BI license plan.
The Power BI dataset is refreshed once a day. Only one dataset is allowed. In case multiple datasets and/or multiple refreshes per day are required, contact us to upgrade your subscription plan.
Support for custom made Power BI reports and measures, as well as integrations with additional data sources will require professional services.
Prerequisites for configuring CardioLog Analytics SaaS with SharePoint On-Prem
- All SharePoint On-Premises environments integrated with our product must use HTTPS with SSL/TLS certificates issued by a publicly trusted Certificate Authority (CA). Connections over HTTP or any non-secure protocols are not supported.
- Access to the internet from all end users workstations, make sure that the following domains are not blocked by the browser: "azurewebsites.net" and "windows.net"
- The SharePoint farm admin service account credentials (make sure the farm admin account has full access rights to the selected web applications in SharePoint Central Administration > Manage Web Application > User Policy).
- Configure a site-to-site VPN to securely access the customers' SharePoint environment from Intlock's Azure network
Access from the CardioLog Analytics SaaS Azure network to the customer’s SharePoint On-Premise API is required. The access method can be configured based on the customer’s preference and security policies, such as:
- Site-to-Site VPN – Secure connection between CardioLog Analytics SaaS Azure network and the customer’s SharePoint environment. The list of supported VPN devices and instructions on configuring the VPN can be found here.
- Public IP with Firewall Rules – Controlled inbound access from the CardioLog Analytics SaaS Azure network.
- Azure Application Proxy – Secure SharePoint access via Microsoft Azure AD Application Proxy.
For more details, please contact Intlock Support.
Prerequisites for installing the CardioLog Analytics SaaS Tracking Agent
- Prepare a user account with the following permissions in order to install the CardioLog Analytics SaaS Tracking Agent:
- SharePoint farm administrator;
- A local administrator on the SharePoint central admin server and WFE servers.
- Make sure you have PowerShell version 5.1 or higher.
- For customers with SharePoint 2019 modern sites,
- Prepare a user account that is a member of the sites Owners group and has Full Control permissions on the App Catalog.
- Verify your environment supports using Apps for SharePoint 2019 and enable Apps for your farm:
- Go to the SharePoint Central Administration.
- Navigate to Apps and Configure Store Settings.
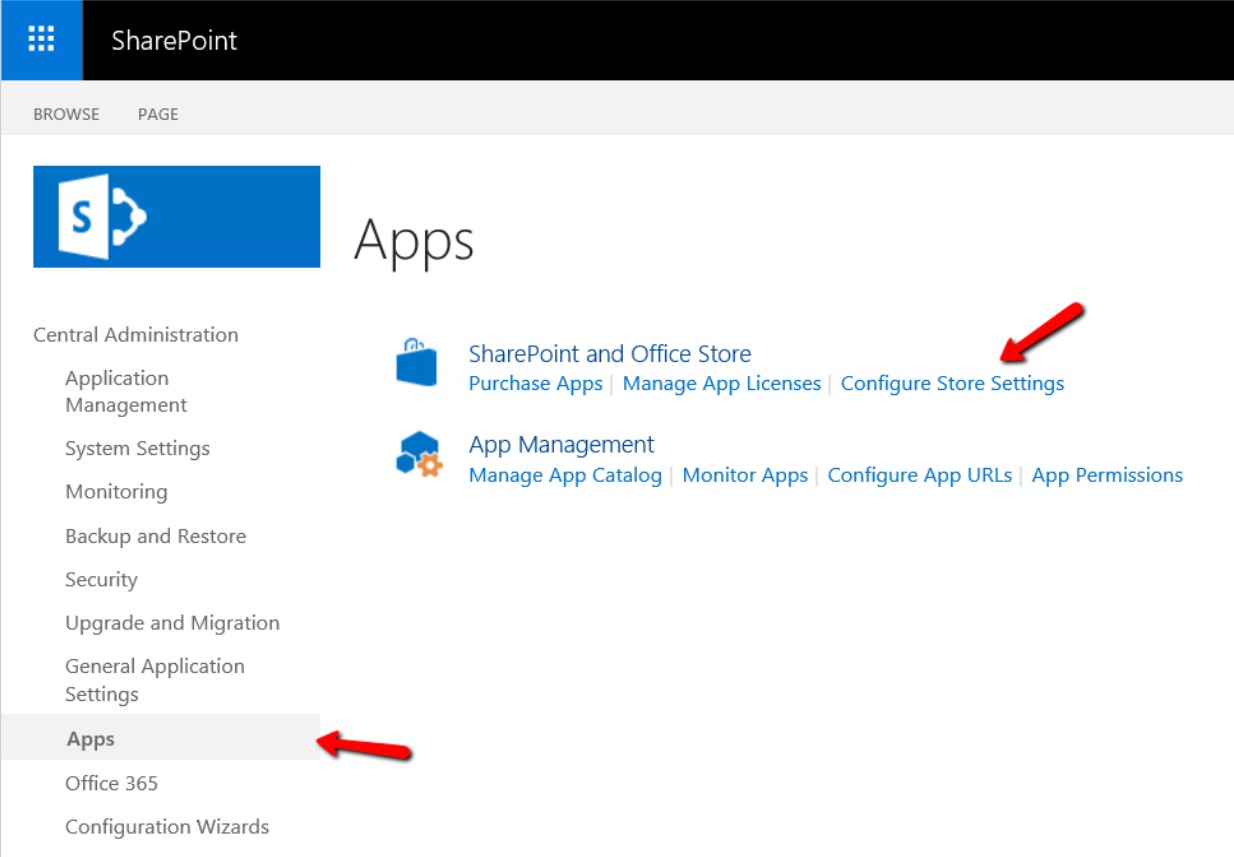
- Make sure you have the App Purchases enabled.
SharePoint Central Administration > Apps > Configure Store Settings > App Purchases > Select Yes for Should end users be able to get apps from the SharePoint Store?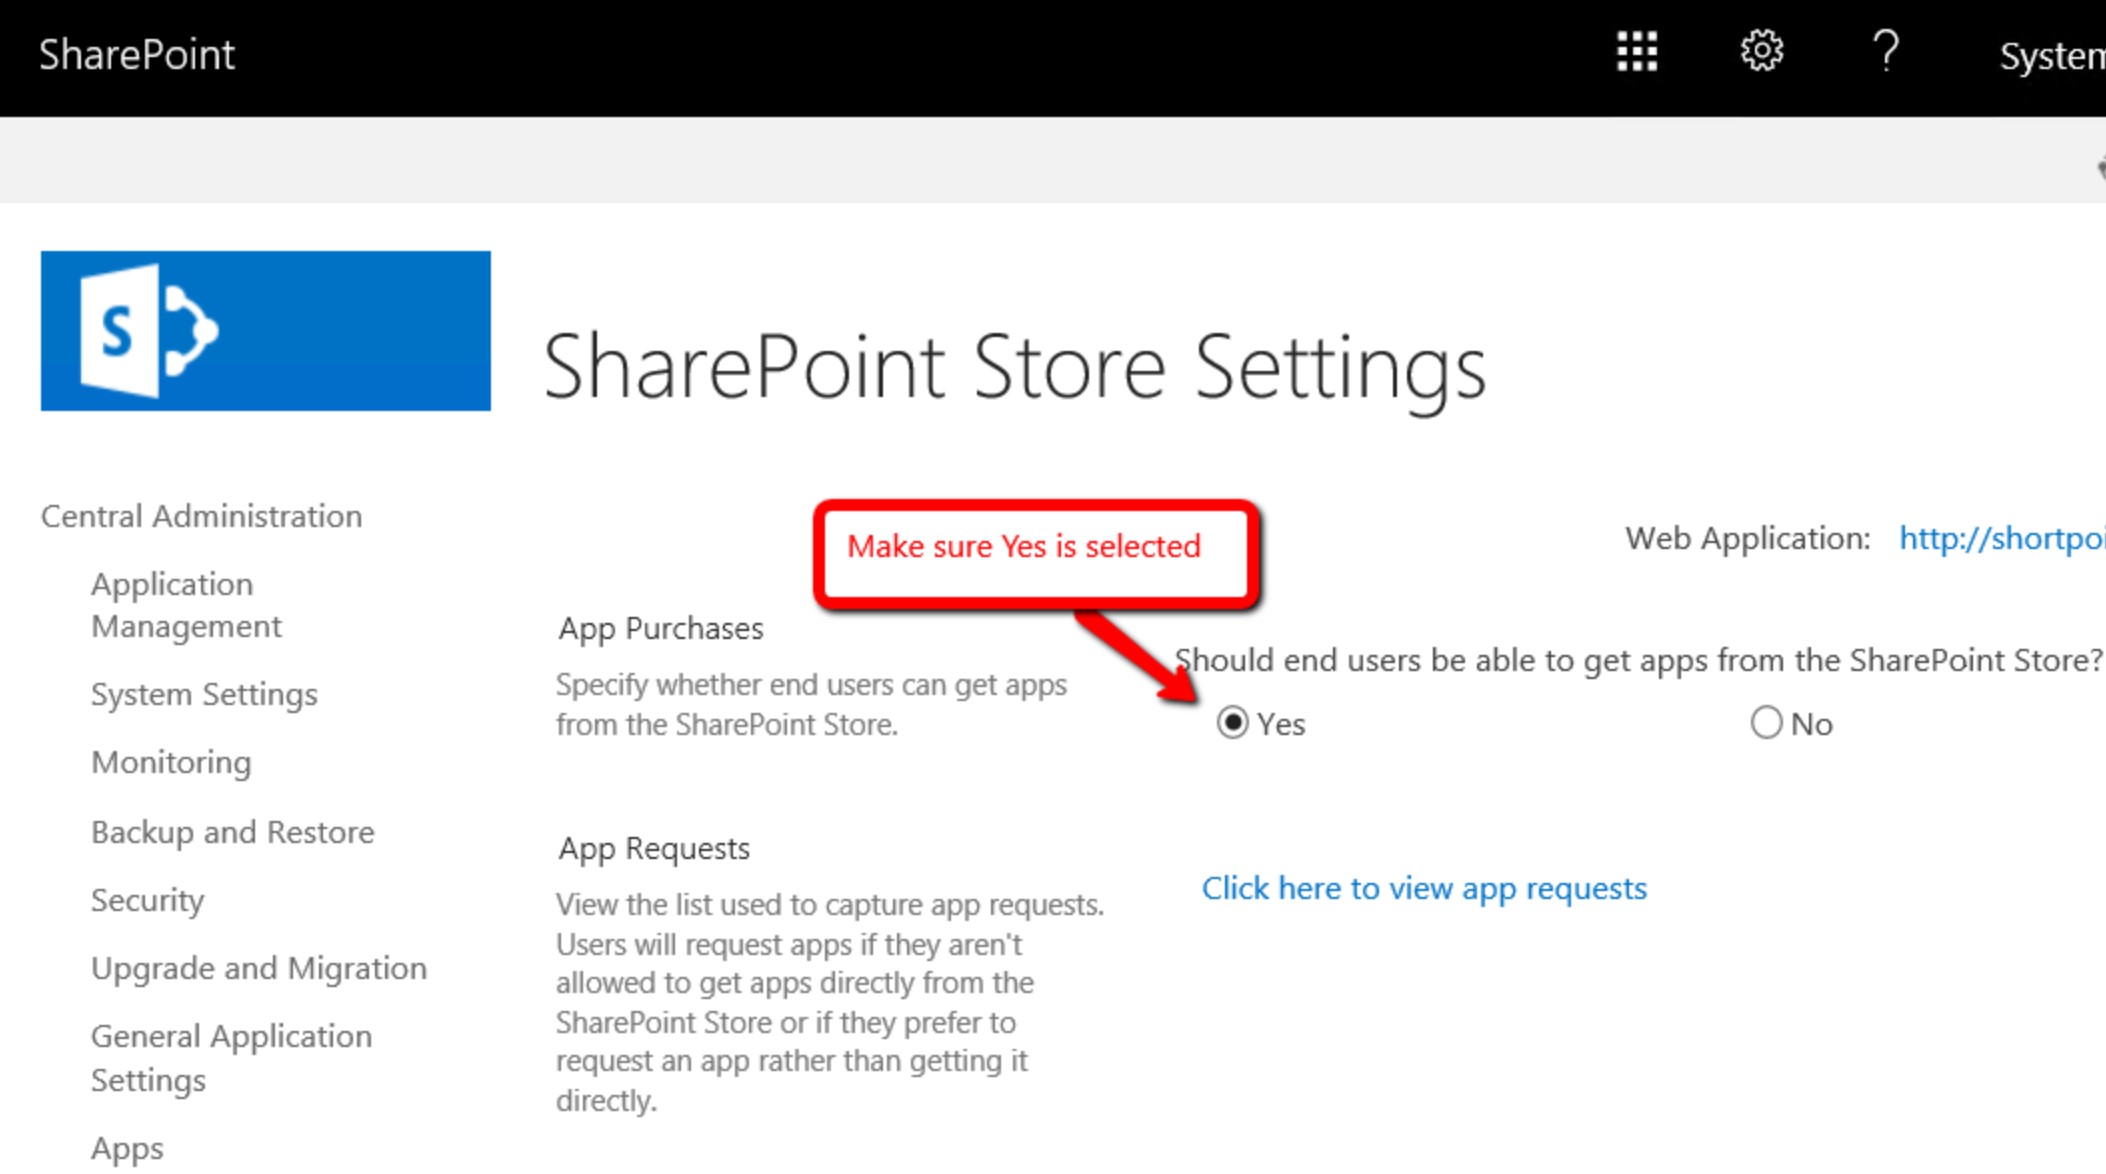
- Go to the SharePoint Central Administration.
- If end users are using IE 9/10/11 with Medium-High security level and above, they will have to manually enable the IE Active Scripting option for the appropriate security zone as follows: Open IE -> Tools -> Internet Options -> Security -> Choose the appropriate security zone (Internet Zone most likely) -> Custom Level... -> Scripting -> Enable the Active Scripting option. Another option is to add the Azure event listener host URL to Trusted Sites. If end users are using IE 9, they will also have to manually enable the Access data sources across domain option as follows: Open IE -> Tools -> Internet Options -> Security -> Choose the relevant security zone (Internet Zone most likely) -> Custom Level... -> Miscellaneous -> Enable the Access data sources across domains option.
Prerequisites for Yammer
Prerequisites for Viva Engage (Yammer)
- A dedicated service account that is a Verified Admin in the Yammer Viva Engage network.
- At least one user account with a Power BI Pro or Power BI Premium Per User (PPU) license (the Yammer Viva Engage reports are displayed in Power BI). This user will become the owner of the app workspace in Power BI and will be able to share it with others in the organization and collaborate on reports.
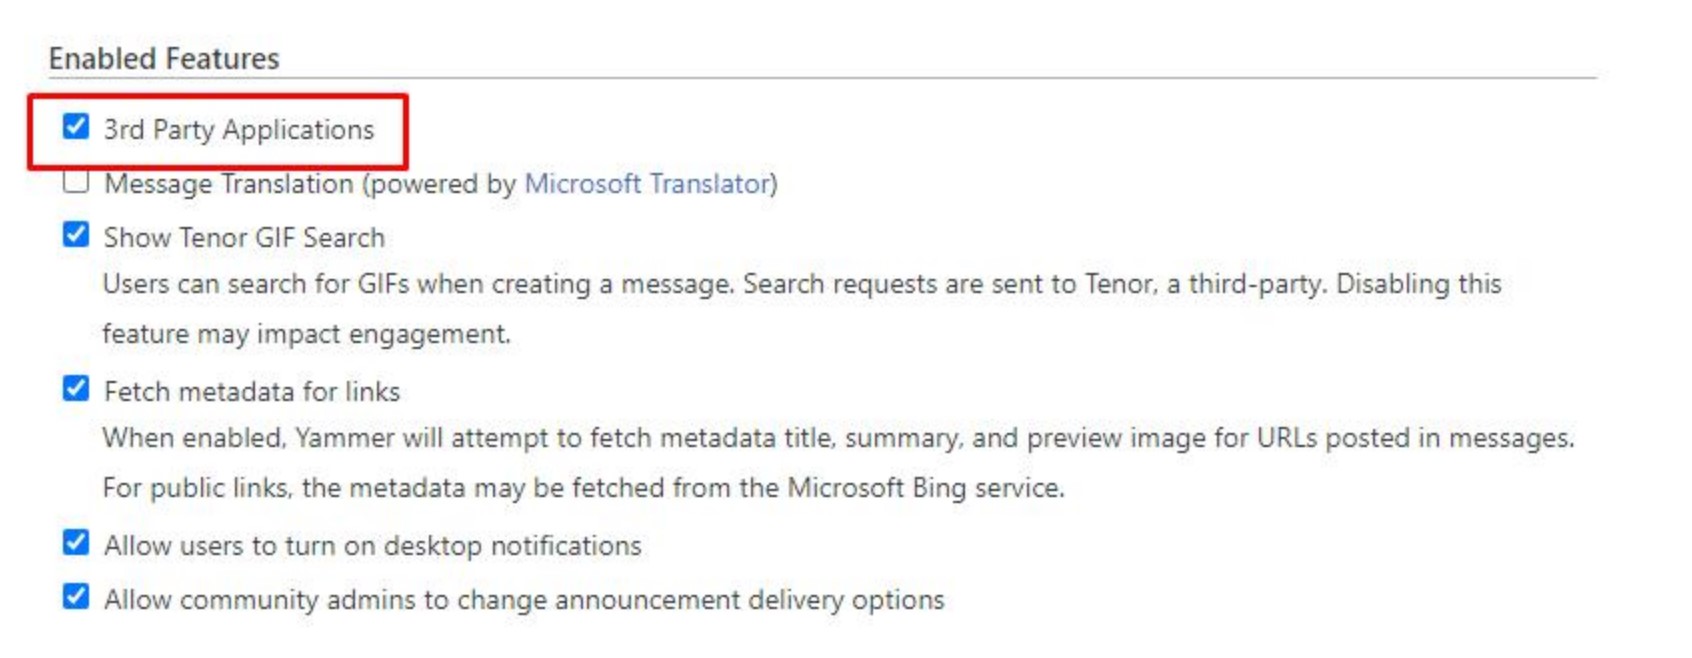
- Enable 3rd Party Applications (to install the CardioLog Analytics SaaS app from the Yammer Apps Directory)
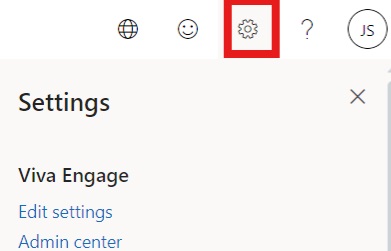
- Log on to Yammer Viva Engage with a verified admin and click on the gear icon to open Settings.

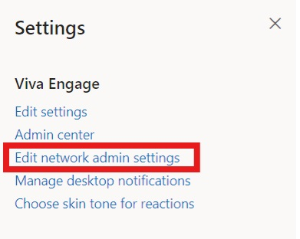
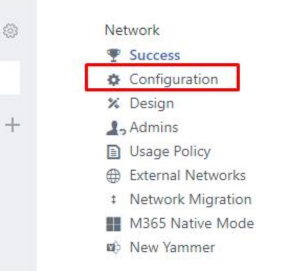
- Settings > Edit Network Admin Settings > Network > Configuration > Enabled Features > select 3rd Party Applications.

- Log on to Yammer Viva Engage with a verified admin and click on the gear icon to open Settings.
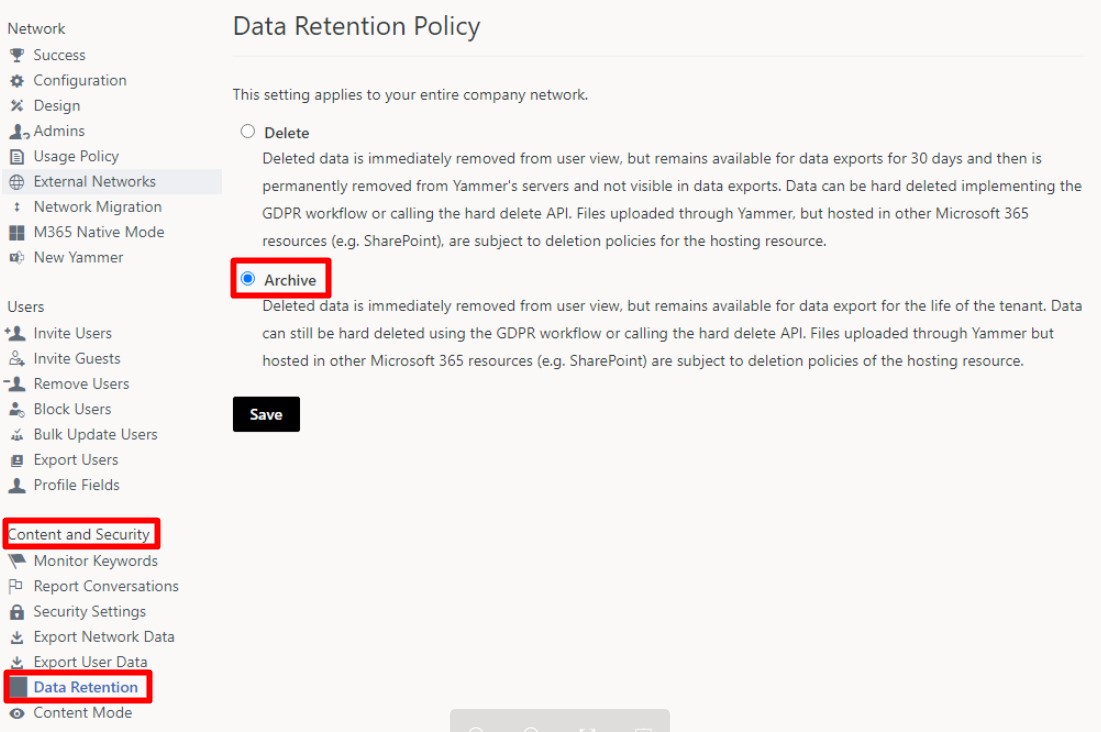
- Enable Archive data retention policy (to import data about deleted content).
- Log on to Yammer Viva Engage with a verified admin and click on the gear icon to open Settings.
- Settings > Network Admin > Content and Security > Data Retention > select Archive option.
- Enable Private Content mode (to import data about private groups)
- Log on to Yammer Viva Engage with a verified admin and click on the gear icon to open Settings.
- Settings > Network Admin > Content and Security > Content Mode > select Private Content mode and click Save.
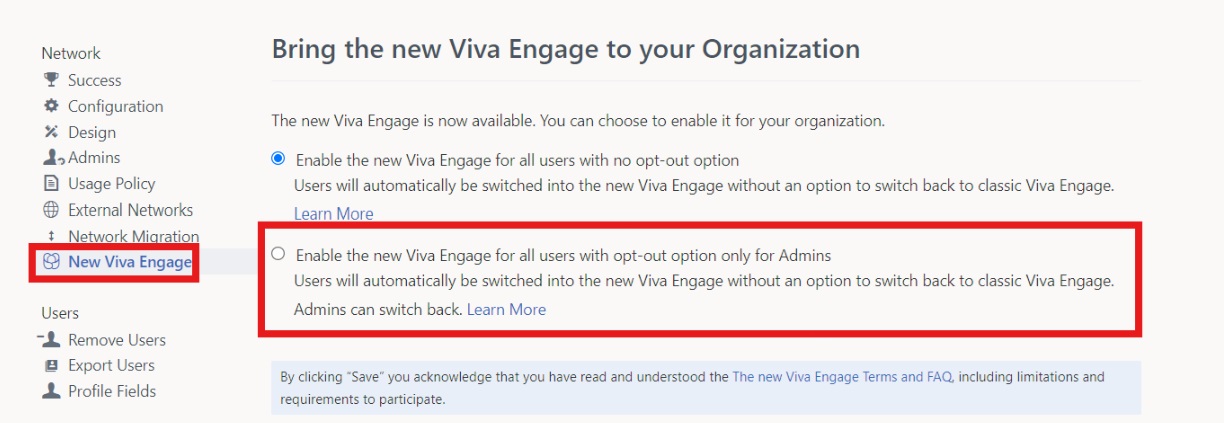
- Enable the new Viva Engage for all users with opt-out option only for Admins (to install the Yammer configuration app).
- Log on to Viva Engage with a verified admin and click on the gear icon to open Settings.
- Settings > Edit Network Admin Settings > Network > New Viva Engage > select Enable the new Viva Engage for all users with opt-out option only for Admins and click Save.
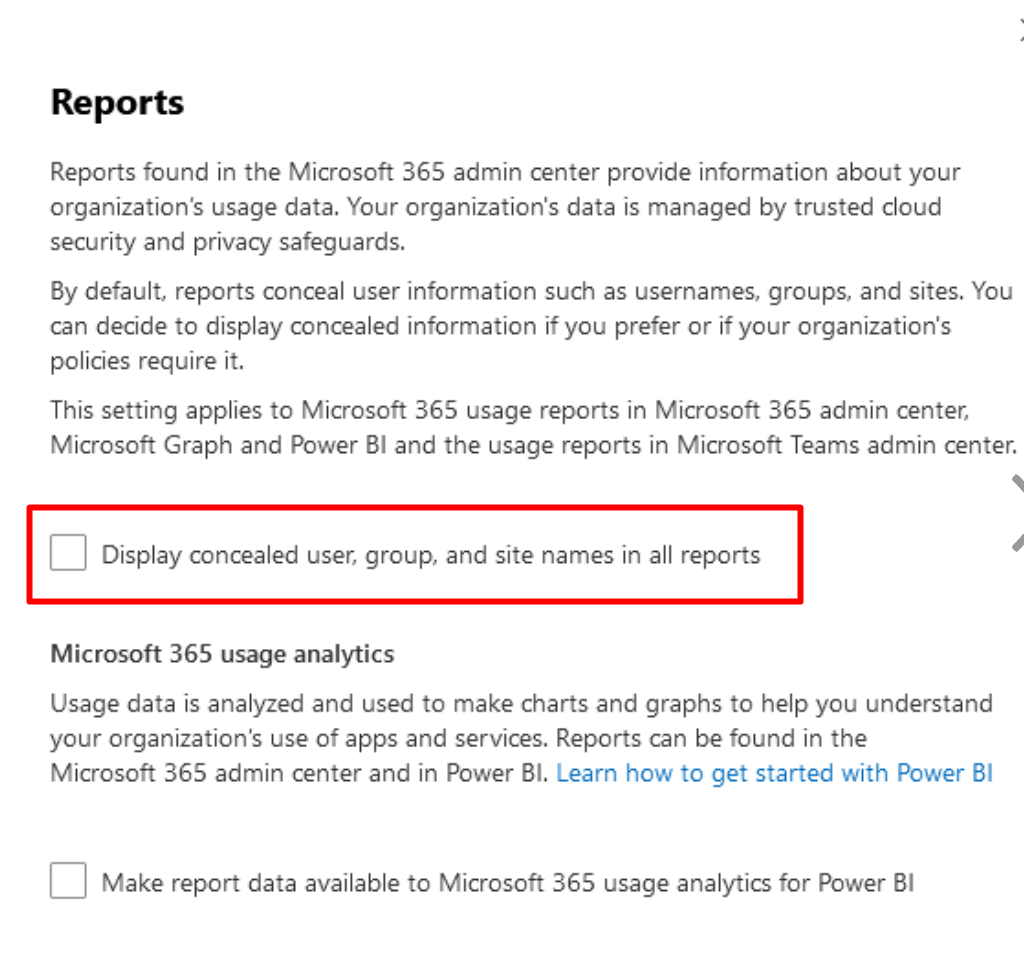
- Disable concealed user, group, and site names (to import actual user names).
- Log on to Microsoft 365 admin center.
- Go to Settings > Org settings > Reports.
- Clear the Display concealed user, group, and site names in all reports option.
...