Page History
Contents
- Running the Configuration Wizard
- feature
- add
- tracking code
- Tracking Document Usage from within Office
- Configuring Multiple Web Applications
- Configuring Multiple Farms
- Configuring Reporting Data Cache
| Anchor | ||||
|---|---|---|---|---|
|
Upon activating CardioLog, the Configuration Wizard will be displayed. This wizard will help you configure the SharePoint Tracking Agent, a tool designed to monitor visitor behavior in SharePoint, and the SharePoint Adaptor, which configures the structure for your SharePoint portal. Additionally you can start the wizard at any time to reconfigure your system by going Administration in the navigation pane and opening System Configuration. Select Configuration Wizard to initialize the system.
...
- Launch CardioLog.
- In the Welcome dialog, select the desired interface language and date format, and your SharePoint version, then click Next.


Configuration Wizard Step 1
This step can be performed in one of the following ways:
Step 2 of the Configuration Wizard, Usage Tracking, can be performed either automatically or manually. Please select only one option to configure the Tracking Agent.Anchor configure tracking code configure tracking code (1) Automatically add the JavaScript tracking code to all SharePoint pages served by the WFE by WFEs by deploying the CardioLog tracking code through a SharePoint solution.
Automatically(2) Automatically add the JavaScript tracking code to all SharePoint pages served by the
WFEWFEs by adding the tracking code to init.js in SharePoint 2010/13/16/19, and core.js in SharePoint 2007 (recommended for test environments only).
(3) Manually add the JavaScript tracking code.
Note: Please select one option only to configure the Tracking Agent.
Deploy
(1) Deploying the 'CardioLog Analytics' SharePoint FeatureAnchor deploy sharepoint deploy sharepoint
CardioLog provides a SharePoint streamlined solution (cardiologtrackingagentfeature.wsp) for for installing the JavaScript tracking code on all of your SharePoint farm pages. This SharePoint solution includes a farm-scoped feature named CardioLog Analytics, which can be activated or deactivated through using SharePoint's Central Administration.
Note: Confirm that you have administrator permissions for your SharePoint farm administrator and local administrator roles on the , SharePoint application server and WFEs are required. Web Front End server before configuring your servers.- In the Usage Tracking dialog, select "Yes, install and activate CardioLog Analytics SharePoint Feature" and enter the SharePoint application server machine name:

Step 2 - Usage Tracking - Click
Next- In the Usage Tracking dialog, select "Yes, install and activate CardioLog Analytics SharePoint Feature" and enter the SharePoint application server machine name:
- Next to continue.
Wait while the wizard installs the cardiologtrackingagentfeature.wsp solution file, deploys the solution throughout all web front ends, and activates the CardioLog Analytics feature. If this step fails, please
refer to the following article - how to install the CardioLog Analytics feature manually.see "CardioLog Analytics" SharePoint Feature Manual Installation Procedure.

Configuration Wizard Step 2 InstallationTo confirm the solution has deployed properly, navigate to SharePoint Central Administration > System Settings > Manage farm solutions
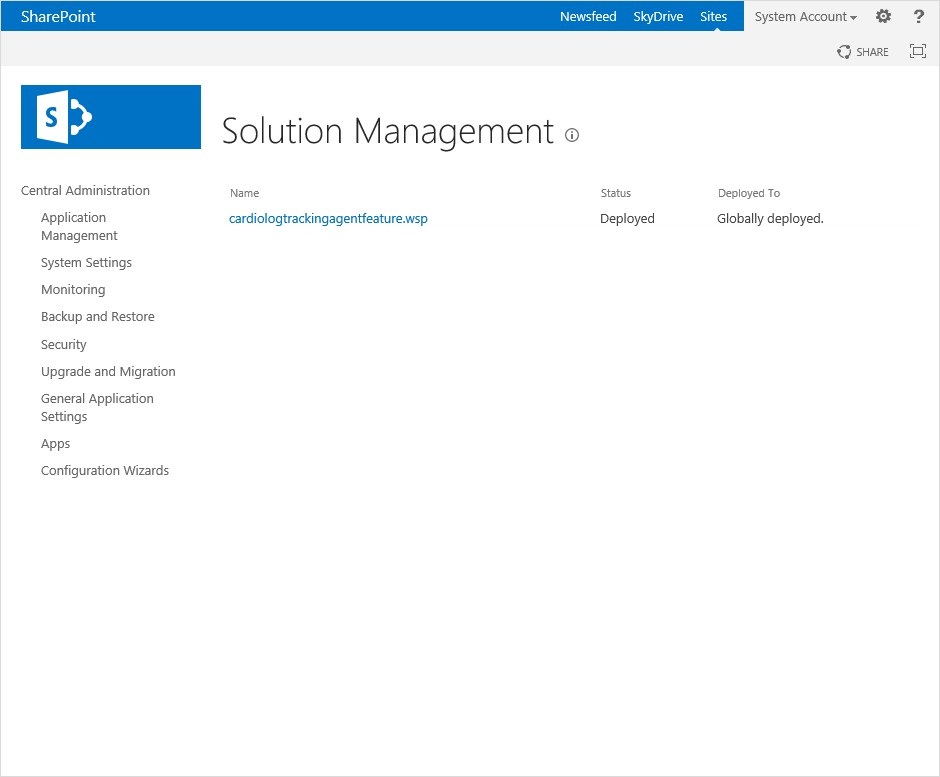
SharePoint
2013 Central Administration - Solution Management
In the Solution Properties window, click cardiologtrackingagentfeature.wsp and verify that the solution was successfully deployed to all web front ends.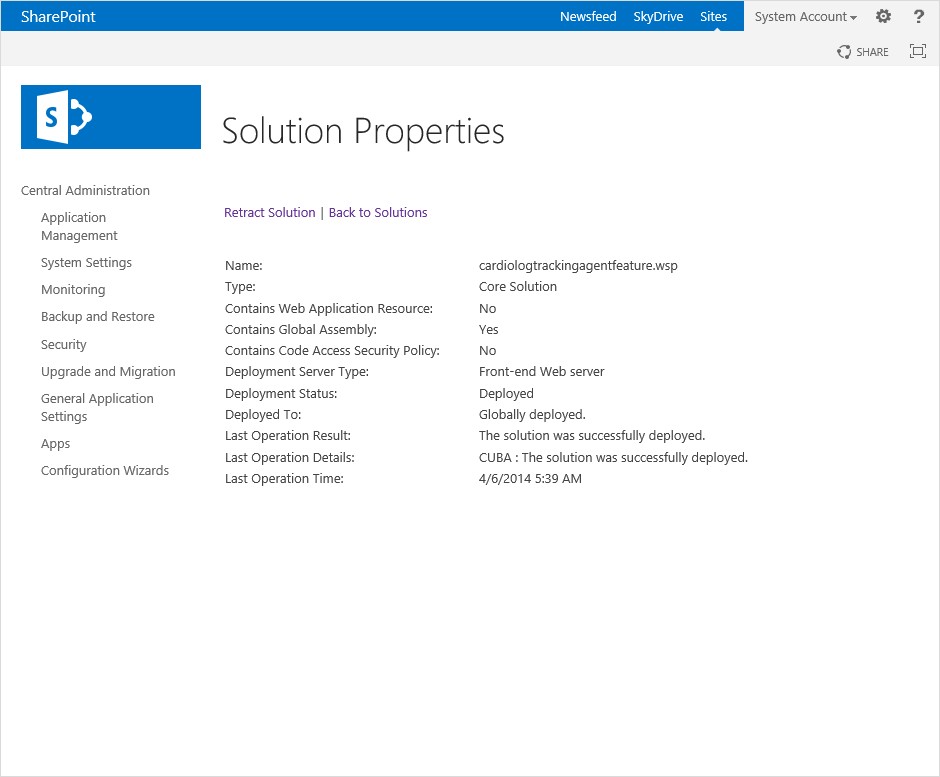
SharePoint
2013 Central Administration - Solution Properties
To view the deployed solution in SharePoint 2010, go to Central Administration > System Settings > Manage farm solutions
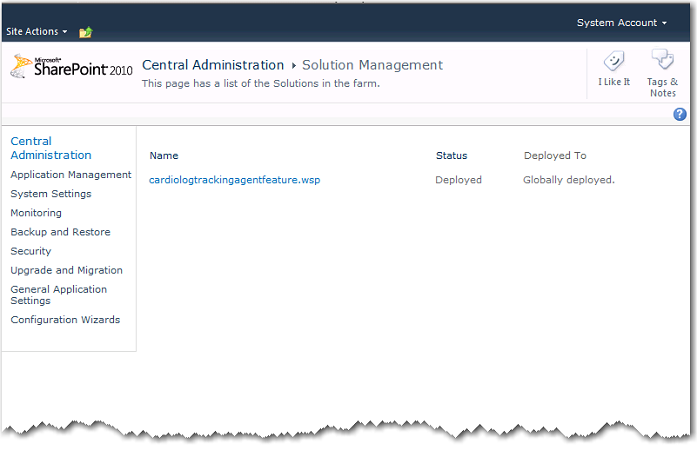
SharePoint 2010 - Solution Management
In the Solution Properties window, click cardiologtrackingagentfeature.wsp and verify that the solution was successfully deployed to all web front ends.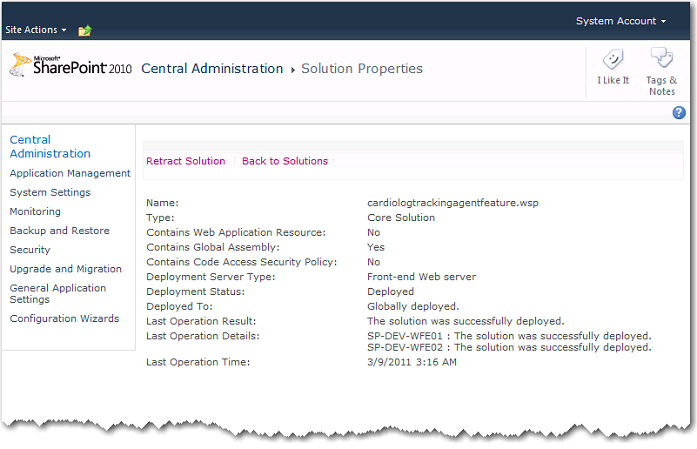
SharePoint 2010 - Solution Properties
To view the deployed solution in MOSS 2007, go to Central Administration > Operations > Solution Management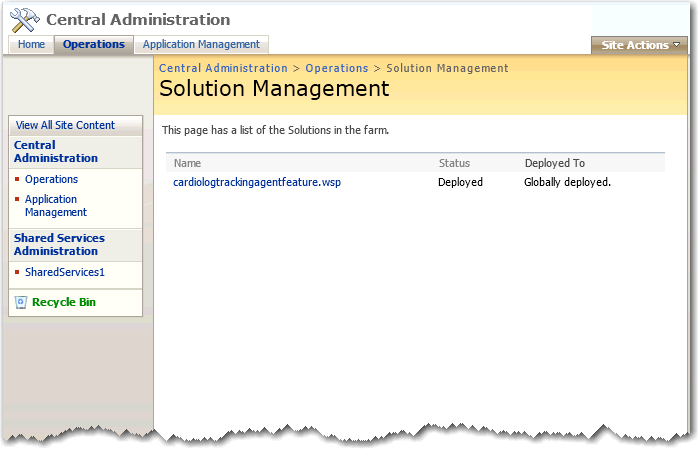
MOSS 2007 - Solution Management
In the Solution Properties window, click cardiologtrackingagentfeature.wsp and verify that the solution was successfully deployed to all web front ends.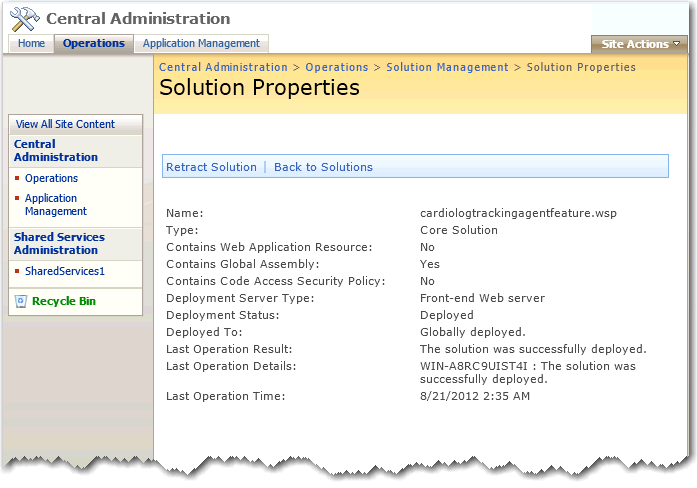
MOSS 2007 - Solution Properties
Activate/Deactivate Data Collection
Upon installation of the The CardioLog Analytics feature
, it is automatically activated and
data is being collected.starts data collection immediately upon installation. The CardioLog Analytics solution may also be manually deactivated and reactivated.
Warning: Deactivating the solution will stop all data collection until reactivated.
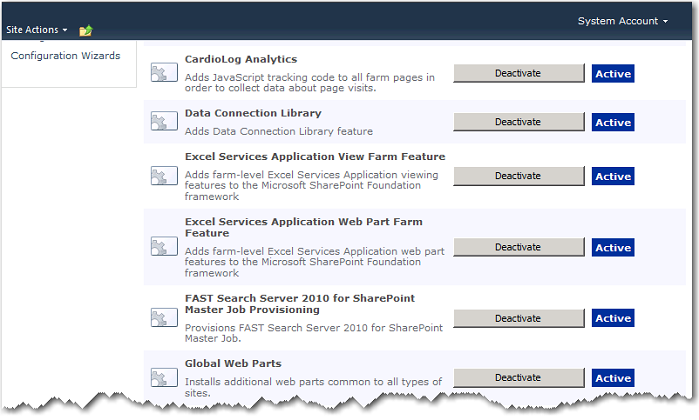
To deactivate the CardioLog Analytics feature
in SharePoint 2013, go to SharePoint Central Administration > System Settings > Manage farm features

SharePoint
2013 Central Administration - Manage farm features
To deactivate the CardioLog Analytics feature in SharePoint 2010, go to Central Administration > System Settings > Manage farm features
SharePoint 2010 - Manage farm features
To deactivate the CardioLog Analytics feature in MOSS 2007, go to Central Administration > Operations > Manage farm features
MOSS 2007 - Manage farm features
Note: The CardioLog Analytics SharePoint Feature will work only for master pages which contain the following control in the head section:<SharePoint:DelegateControl runat="server" ControlId="AdditionalPageHead" AllowMultipleControls="true"/>
This control is included in the master pages for all SharePoint templates, except the MOSS 2007 Publishing Site master page.
Add this control to all MOSS 2007 Publishing Site master pages, right before the closing </HEAD> tag. Alternatively, you can also use a top master file, which is included in all of the Publishing Sites master pages, in order to perform a single update.
To view the deployed solution in SharePoint 2013, go to Central
Warning: The deactivation operation will stop data collection
Add
(2) Automatically add the JavaScript tracking codeAnchor auto add java auto add java Notes: This step should be done for each WFE. The CardioLog service account must have write permissions to the SharePoint template directory:
[SharePoint 2016 Server]\%PROGRAMFILES%\Common Files\Microsoft Shared\web server extensions\16\TEMPLATE
[SharePoint 2013 Server]\%PROGRAMFILES%\Common Files\Microsoft Shared\web server extensions\15\TEMPLATE
[SharePoint 2010 Server]\%PROGRAMFILES%\Common Files\Microsoft Shared\web server extensions\14\TEMPLATE
[SharePoint 2007 Server]\%PROGRAMFILES%\Common Files\Microsoft Shared\web server extensions\12\TEMPLATE
In the Usage Tracking dialog, select "Yes, add the tracking code to my SharePoint INIT.JS files" and enter the SharePoint WFE server names, to allow CardioLog to automatically add the tracking code to all SharePoint pages served by the all the WFEs in your farm (the tracking code is added to init.js in SharePoint 2010, SharePoint 2013 and SharePoint
20132016, and core.js in SharePoint 2007).
- Click Next
Note: If your SharePoint website runs on SSL, you will have to create a certificate for the CardioLog website and configure it to enable SSL. See how to configure the Tracking Agent with SSL for more details.
Alternatively, you can install the CardioLog Analytics SharePoint Feature.
See how to configure the Tracking Agent with SSL for more details.
Step 2 - Usage Tracking Installation Options
- Enter the WFE server names and click on Add.
- Click Next to continue.
(3) Manually addAnchor manually add java manually add java Add a JavaScript tracking
codeCode
If you wish to add the tracking code yourself - select "No, I will add the tracking code myself." and copy the JavaScript tracking code to a common page component of your choice
- such as, including master pages, page toolbars, Web Parts,
footer, etcheaders or footers. If you choose a common JavaScript (.js) file, verify you have removed the opening and closing <script> tags
!- Testing the tracking Agent:
1., or you will not be able to correctly collect usage data.
Click Next to continue, which will start the event collection test.
- In order to verify that your SharePoint pages are tracked, follow these steps:
- Open a new browser window and click Next Step.
- Delete your browser temporary internet files and click Next Step.
- Browse 3 pages on your SharePoint Online website and click Next Step.
- Click Test Event Collection.
- The Wizard will now verify usage events tracking.

Step 2 - Usage Tracking
TrackingOtherwise,
- Navigate to your SharePoint Online site homepage with Internet Explorer, Chrome, or FireFox.
- Press Ctrl+F5 to clear the cache and reload the page.
- While on the SharePoint website page, click Ctrl+F12. The tracking agent console should pop-up, displaying the ID number for the most recent monitored action (event). To close the console, press Ctrl+F12.
In the SharePoint Adaptor dialog, enter the SQL server instance name and the SharePoint configuration database name for your farm. Specify the authentication method used to connect to the database, then click Next.Anchor configure tree structure configure tree structure
Note: Please confirm that the CardioLog service account has read permissions (data reader) for all SharePoint configuration and content databases.
Step 3 - SharePoint Adaptor
- In the SharePoint Adaptor dialog, select the SharePoint website/(s) you wish would like to report on.
- Enter the name of one of your SharePoint WFE'sWeb Front Ends, then click Next.
Note: Loading your SharePoint tree structure may take several minutes (, depending on the number of items in the selected web sites).
Step 3 - SharePoint Adaptor Web Site Selection - In the SharePoint SharePoint Adaptor dialog, expand the web site tree and verify that it shows the your desired SharePoint web application, then click Next.Step 3 - SharePoint Adaptor
- In the Usage Data Processing dialog, wait until the CardioLog Scheduling has activated, then click Next.

Configuration Wizard Step 4 - Usage Data Processing
- In the Finish dialog, you should be created with a confirmation that everything has been properly configured, and then you can click Finish. Click Show Raw Usage Data to view the usage events collected thus far. The All data will be available in reports in within the next hour.
Step 5
Configuration Wizard - Finish
- Assign roles for users to grant access to CardioLog.
- Configure email Configure email alerts for scheduled services and event collection thresholds that thresholds that will be sent to the administrator in case of system failure.
- Configure the Active Directory Updates serviceUpdate Service in order to segment authenticated visitors by their user names and their groups.
...
...
<system.web>
<httpModules>
<add name="CardioLogHttpModule" type="CardioLog.HttpModules.EventsModule,CardioLogHttpModule, Version=1.19.154.6, Culture=neutral, PublicKeyToken=56b51e29d93ab3fb" />
...
<system.webServer>
<modules>
<add name="CardioLogHttpModule" type="CardioLog.HttpModules.EventsModule,CardioLogHttpModule, Version=1.19.154.6, Culture=neutral, PublicKeyToken=56b51e29d93ab3fb" />
...
<add key="CardioLog.Events.ExcludeUserAgents" value="Microsoft Office Existence Discovery*"/>
<add key="CardioLog.API.EventsServiceUrl" value="http://<CardioLog server>:<port>/CardioLogAPI/Events.asmx"/>
<add key="CardioLog.Events.LogFile" value="C:\CardioLogHttpModule.log"/>
<add key="CardioLog.Events.LogLevel" value="None"/><!--None,Error,Message-->
<add key="CardioLog.Events.SharePointVersion" value="2013"/>
<!-- Support claims based authentication -->
...
[Installation directory] - by default, the CardioLogAgent folder is located in the CardioLog Installation folder. If the "CardioLog Analytics" SharePoint feature is installed, the CardioLogAgent folder is located on all SharePoint WFEs under the SharePoint website "_layouts" folder.
...
In order to monitor an additional web application in your existing farm, please do the following:
...
In order to monitor multiple SharePoint farms per adaptor, please do the following:
...
...
In <CardioLog Installation Folder>\SP20XXTree\web.config (XX - 07 for MOSS 2007, 10 for SharePoint 2010, 13 for SharePoint 2013), add the following keys to the <appSettings> section with the "profile_1_ "prefix (additional farms are considered additional profiles):
- profile_1_includedWebApps - this is a star separated list of web applications (virtual servers) to include in the tree.
- profile_1_SharePointTemplatePath - this is the full path for the SharePoint 'TEMPLATE' directory (XX - 12 for MOSS 2007, 14 for SharePoint 2010, 15 for SharePoint 2013)
- profile_1_FarmFolderName - Optional. This is the title of the farm folder which will be displayed in the CardioLog tree structure in the Analysis Center.
- profile_1_outputFilePath - this is the full path of the CardioLog installation folder 'Logs' directory which will store the tree structure output file (XX - 07 for MOSS 2007, 10 for SharePoint 2010, 13 for SharePoint 2013).
<appSettings>
<add key="profile_1_includedWebApps" value="http:// <sharepoint server name>:<port>*" />
<add key="profile_1_SharePointTemplatePath" value="\\<sharepoint server name>\C$\Program Files\Common Files\Microsoft Shared\Web Server Extensions\XX\TEMPLATE\" />
<add key="profile_1_FarmFolderName" value="SharePoint 2010" />
<add key="profile_1_outputFilePath" value="<CardioLog installation folder>\CardioLogScheduleServices\Logs\SP20XXTree_1.xml" />
</appSettings>
Add the following keys to the <connectionStrings> section:
- profile_1_configDB - this is the connection string for the SharePoint configuration database.
- profile_1_contentDB - this is a place holder for creating connection strings to the SharePoint content databases. Note: Leave "Initial Catalog={0};Data Source={1} " as it is.
<connectionStrings>
<add name="profile_1_configDB" connectionString="Integrated Security=SSPI;Persist Security Info=False;Initial Catalog=<sharepoint config database name>;Data Source=<database server name>" />
<add name="profile_1_contentDB" connectionString="Integrated Security=SSPI;Persist Security Info=False;Initial Catalog={0};Data Source={1}" />
</connectionStrings>
Go to Administration > CardioLog Scheduling Service > Portal Tree Updates and add the new profile to the Portal Tree Updates web services list:
http://<CardioLogServer>:<port>/SP20XXTree/default.aspx?profile=1&output=file&logFilePath=[CardioLog Installation Folder]\CardioLogScheduleServices\Logs\SP20XXTree_1.xml (XX - 07 for MOSS 2007, 10 for SharePoint 2010, 13 for SharePoint 2013)
Restart the CardioLog Scheduling Service. The tree structure will be refreshed the next day.
Note: In order to add multiple farms, use the profile_2_, profile_3_ etc... prefix.
...
To improve performance, CardioLog caches the results for each reporting query in accordance with the specific report filters used. In the Cache Configuration page, you can define the amount of time queries are cached, and clear the entire reporting cache.
- In the Administration pane, click System Configuration, and then select Reporting Data.
- In the Reporting Data Cache Configuration box, check Enable Reporting Data Caching to enable report caching.
- Fill out a value for the Cache life time in days field.
- Click Save
- Click Clear Cache if you want to clear the entire reporting cache.
...
System Configuration > Reporting Data