
Prerequisites for SharePoint Online
- Access to the internet from all end users workstations, make sure that the following domains are not blocked by the browser: "azurewebsites.net" and "windows.net"
- If end users are using IE 9/10/11 with Medium-High security level and above, they will have to manually enable the IE Active Scripting option for the appropriate security zone as follows: Open IE -> Tools -> Internet Options -> Security -> Choose the appropriate security zone (Internet Zone most likely) -> Custom Level... -> Scripting -> Enable the Active Scripting option. Another option is to add the event listener host URL to a IE security zone with Medium or lower security level (e.g. Trusted Sites) or to add the Azure event listener host URL to Trusted Sites. If end users are using IE 9, they will also have to manually enable the Access data sources across domain option as follows: Open IE -> Tools -> Internet Options -> Security -> Choose the relevant security zone (Internet Zone most likely) -> Custom Level... -> Miscellaneous -> Enable the Access data sources across domains option.
The URL of the SharePoint admin center of the SharePoint tenant you will be setting CardioLog Analytics on.
At least one Power BI pro account (there is no need to install Power BI for desktop, users will login to the Power BI web interface). This user will become the owner of the app workspace in Power BI and will be able to share it with others in the organization and collaborate on reports. End users who just need to consume reports, do not need a Power BI pro account. You can export reports for them (to CSV, PDF, Excel) or embed the report within SharePoint (using the publish to web - creates a public link to the report).
- Global admin permissions to install the CardioLog Analytics App.
- Make sure you have the MSOnline module in PowerShell.
- Make sure any SharePoint preservation policies you may have are temporarily turned off, while installing the CardioLog Analytics SaaS App, in order to approve the App:
Office 365 Admin > Security and Compliance > Data governance > Retention > Policies > set Status Off
- Make sure control access based on specific network locations is turned off, in order to allow communications to CardioLog Analytcs SaaS.
Office 365 Admin > Admin Centers > SharePoint Admin Center > Device access > Control access based on network location > Uncheck "Only allow access from specific IP address locations"
- Make sure custom scripts are turned on (changes in this setting take up to 24 hours to apply):
Office 365 Admin > Admin Centers > SharePoint Admin Center > Settings > Custom Script > Select Allow in both options

- Verify an App Catalog is available in the SharePoint Online tenant:
- Sign in to Office 365 with your SharePoint Online global admin account.
- Go to the SharePoint admin center.

- Select Apps from the Quick Launch bar on the left, and then select App Catalog
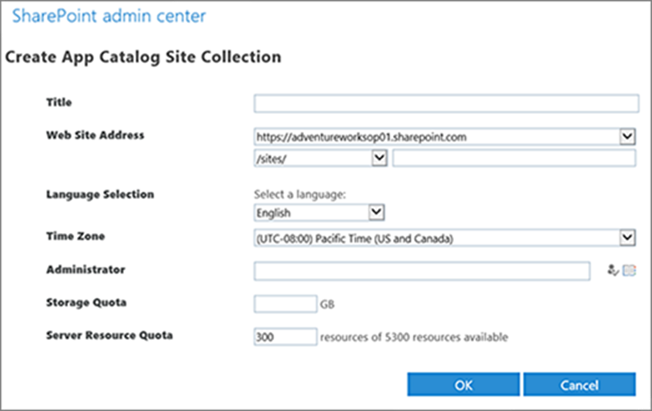
- If there is no app catalog site created yet, select Create a new app catalog site, and then select OK.

- On the Create App Catalog Site Collection page, enter the required information, and then select OK.
Prerequisites for SharePoint 2013/2016
- Access to the internet from all end users workstations, make sure that the following domains are not blocked by the browser: "azurewebsites.net" and "windows.net"
- If end users are using IE 9/10/11 with Medium-High security level and above, they will have to manually enable the IE Active Scripting option for the appropriate security zone as follows: Open IE -> Tools -> Internet Options -> Security -> Choose the appropriate security zone (Internet Zone most likely) -> Custom Level... -> Scripting -> Enable the Active Scripting option. Another option is to add the Azure event listener host URL to Trusted Sites. If end users are using IE 9, they will also have to manually enable the Access data sources across domain option as follows: Open IE -> Tools -> Internet Options -> Security -> Choose the relevant security zone (Internet Zone most likely) -> Custom Level... -> Miscellaneous -> Enable the Access data sources across domains option.
- At least one Power BI pro account (there is no need to install Power BI for desktop, users will login to the Power BI web interface). This user will become the owner of the app workspace in Power BI and will be able to share it with others in the organization and collaborate on reports. End users who just need to consume reports, do not need a Power BI pro account. You can export reports for them (to CSV, PDF, Excel) or embed the report within SharePoint (using the publish to web - creates a public link to the report).
- The SharePoint farm admin service account credentials (make sure the farm admin account has full access rights to the selected web applications in SharePoint Central Administration > Manage Web Application > User Policy).
- Configure a site-to-site VPN to securly access the customers' SharePoint environment from Intlock's Azure network. The list of supported VPN devices and instructions on configuring the VPN can be found here. Contact us for more details.
Prerequisites for Yammer
- A dedicated service account that is a Verified Admin in the Yammer network.
- At least one Power BI pro account (the Yammer reports are displayed in Power BI). This user will become the owner of the app workspace in Power BI and will be able to share it with others in the organization and collaborate on reports.
- Enable Soft Delete
- Log on to Yammer with a verified admin and click on the gear icon to open Settings.

- Settings > Network Admin > Content and Security > Data Retention > select Soft Delete option
- Log on to Yammer with a verified admin and click on the gear icon to open Settings.
- Enable Private Content mode (to import data about private groups)
- Log on to Yammer with a verified admin.
- Go to Settings > Network Admin > Content and Security > Content Mode > select Private Content mode and click Save.