Page History
...
- On the main Campaigns page, click Add Campaign.
- Fill in the name of the campaign, along with its type and source. The type (medium) and the source provide specific information about the campaign.
Campaign Name - The campaign name should describe the campaign you are running. Here you are able to can specify the promotion or the campaign slogan of the campaign. For example, if you run 're running a special promotion for ChristmasSummer, you can might identify the campaign as "Christmas Summer Sale".
Campaign Type - The medium the campaign is using. For example, if you drive 're driving traffic from a newsletter, the campaign medium can be called "email"should be Email.
Campaign Source - Traffic from campaigns have an origin or source. This source can be a site the visitor came from, or the name of a newsletter or a search engine. For example, if you create a campaign for a specific web-site and you are placing ads there, the source will be the name of that site.
For example:
- Campaign Name - Twitter
- Campaign Type - Social
- Campaign Source - twitter.com
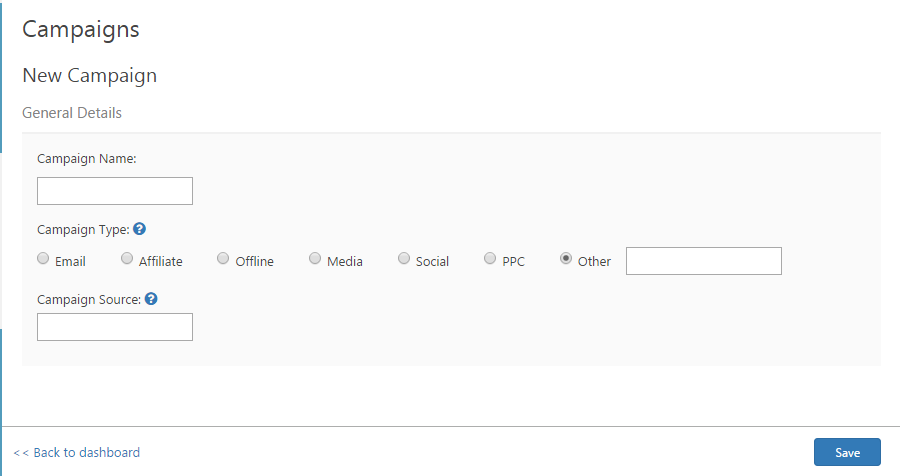
New Campaign Add Campaign dialog - Click Save and another two new items will appear at the bottom of the window.
Tracking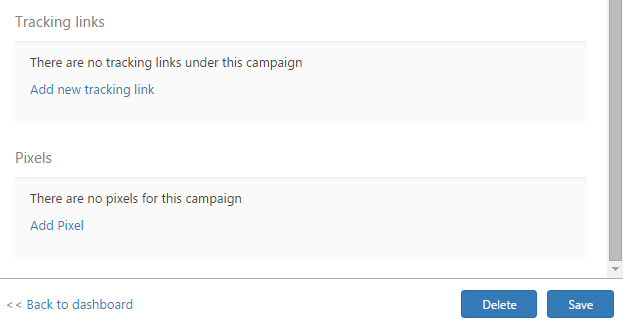
Tracking links and Pixels - Add a new tracking link by filling in the parameters and by creating its shortened link.
For each tracking link, you can define two extra dimensionsfields: Term and Content. These two dimensions should be used in such way that will fields allow you to run several types of breakdownsmore thoroughly describe the campaign. For example, for a display campaign (bannersbanner ad) campaign, you can use the "Term" field field to specify the size of the banner (250x250, skyscraper etc) or the placement of the banner (Header, Sidebar, Popup etc). Additionally, the "Content" will hold the creative type or the content of the ad.
The Content field helps describe the type of ad or other identifying notes.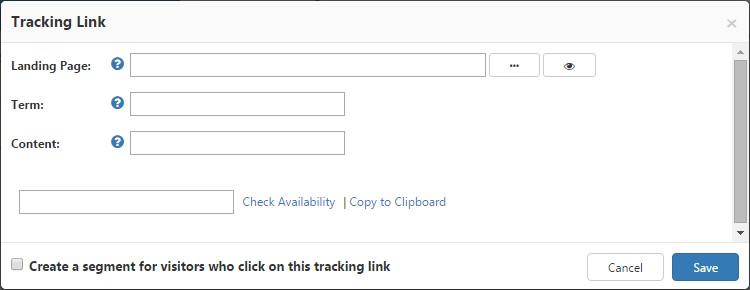
Tracking Link dialog
Note: Users who click Clicks are counted when a user clicks the tracking link will be counted as clicksthe first time. If the user clicks the tracking link again it will not count , unless the user clears his cache or does not use cache.their cache, has disabled their cache, or clicks the link from a different browser or device..
- Add a new Pixel for your affiliates.
Some of the publishers require a conversion tag (, or pixel) , to be placed in specific conversion points on your site (for . For example CPA campaigns or when you work and working with blind networks )often require it. Using The SharePoint Marketing Suite pixel support, you can define the conversion tag or the pixel you want the Marketing Suite to use when a certain goal is completed.Use [KEY] and [Random] to define dynamic property and cache busterSome of the publishers rely on cookies, while others rely on data passed to the advertiser when they redirect visitors to the landing page. If your publishers use the second method (passing dynamic data to the landing page), please instruct them to send the information they want to receive in a parameter called "CDP" (for example, the URL of the landing page will look like this: http://yourtinyurldomainyourshorturldomain.com/sf23SAv?CDP=12345). Now, all you have to do is create the pixel and use the placeholder [KEY] to define where you want us to place the value we obtained (12345). For example: http://publisherdomain.com/pixel.php?value=[KEY] - that way, when we initiate a pixel call, we will replace [KEY] with the relevant value for that specific visitor.Use the [Random] placeholder to add a cache buster parameter to the pixel in case the publisher requests it. For example, http://publisherdomain.com/pixel.php?value=[KEY]&r=[Random]. The [Random] placeholder will be replaced with a random number to avoid caching issues on the visitor browser or CDN.
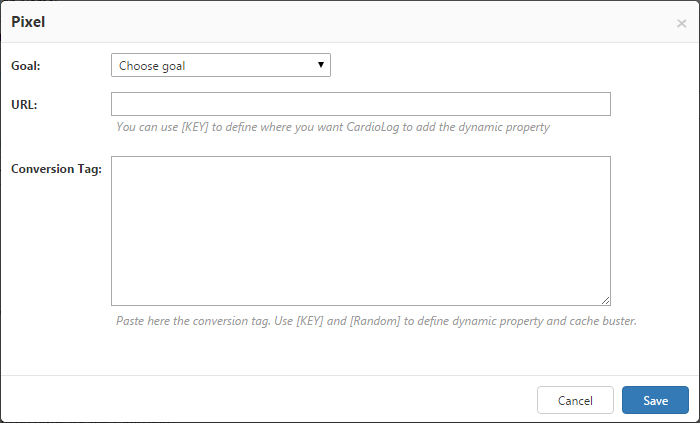
Pixel dialog
Pixel DialogMake sure to click Save on the Tracking Links and Pixel dialogs when done.- Once you have finished editing the campaign click Save from the Campaign main window.
Note - When adding a campaign, a new visitor segment is created for it, which can be used in web analytics reports, Behavioral Targeting and Voice of Customer.
How to add personalized content to a Campaign
- Click the name the Campaign you would like to edit from the Campaign main window.
- On the Campaign page, click Personalize Content in the upper right hand corner.
- In the popup dialog, fill in the Page parameter by opening the object explorer Object Explorer elipses and selecting an item.
- Choose Choose UI Elements or Create a new UI Element.
- Choose the visitors Segment.Give it a title Segment you would like to target, A segment is built from one or more conditions including Traffic source, Visitor Type, Goals, Visits, Last seen, Browser and OS, User agent, Country, URL, Referrer, Cookie, AB or Multivariable Test.
- Name it with a Title.
- Click Save.

Add Personalized Content Dialog
Note that using this module requires configuration (See how to configure Shorten Links).